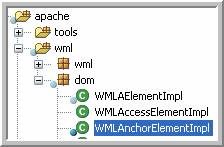
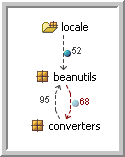
Tagging is a simple but powerful feature that lets you understand how sets of items and dependencies map to different slices, hierarchies or architectural components.
Generally tags are transient, and will be lost between sessions. There is also just a single tag set. If you wish to save tags between sessions (and/or create multiple named tag sets) you can "Export tags", and later import them again. When you import, you can either "Add" or "Replace" tags - the former is effectively an "and" operation. This also lets you import sets of items from other sources (e.g. a change set from git) and quickly find them (and their dependencies) in the model.
When you tag an item or dependency (you can do this from pretty much anywhere in the UI), the icons for the corresponding code-level items get adorned like this: ![]() . Any composite item that contains such items is marked with a faded adornment like this:
. Any composite item that contains such items is marked with a faded adornment like this: ![]() . When all of the items contained by a composite item are tagged, then the adornment becomes solid. Edges follow the same scheme. This makes it very easy to browse tagged items through a hierarchy:
. When all of the items contained by a composite item are tagged, then the adornment becomes solid. Edges follow the same scheme. This makes it very easy to browse tagged items through a hierarchy:


Tagging is controlled from the Tag menu, the main toolbar and the context menu (right-click).
The key thing to understand with tagging is that it works on the code-level items and dependencies. For example, when you tag an item, you are tagging only the code-level items contained by that item. The tag status of higher-level items is derived from the tag status of its contained items. This allows powerful analyses across the multiple Structure101 Studio views.
The Tag commands are available when an item or a dependency is selected or right-clicked. As well as tagging or untagging items directly, you can tag or untag items that are related to a specified item:
- Tag/untag selected (items and/or dependencies). All of the code-level elements contained by the selected element(s) are tagged. This will cause any selected composite elements to become fully tagged.
- Tag Uses selected (or Used by selected) Directly (items only). Any code-level items that directly use (or are used by) the selected item are tagged.
- Tag Uses selected (or Used by selected) Indirectly (items only). Any code-level items that directly or indirectly use (or are used by) the selected item are tagged.
- Tag/untag 'from' (or 'to') items (dependencies only). All of the code-level items on the 'from' or 'to' end of a dependency are tagged/untagged.
- Clear all tags. All items in the project are untagged.
- Invert tags (items or dependencies). Any code-level elements that are tagged are untagged, all others are tagged.
- Add tags from file. You will be prompted for the location of a file that contains a set of tags. The items (and/or dependencies) in the file will be tagged in addition to any currently tagged items. Files can be created from Studio ("Export"), or you can create them any way you wish - just ensure the format is as expected (do an export to see the format).
- Replace tags from file. Again you will be prompted a the file name. This time any existing tags are cleared, before the items and dependencies in the file are tagged.
- Export tags to file. You will be prompted to give a filename into which all tagged items and dependencies are written. You can later import ("Add" or "Replace") the tags again. This lets you save named tag sets that can be combined as needed, and which persist between sessions.